HD559
back to Sennheiser
back to measurements
home
published: Nov-16-2020, updated: Dec-13-2021

NO SMOOTHING is applied to the shown plots. Most measurement sites have some smoothing applied which ‘irons flat’ sharp peaks and ‘wiggles’. I do not use smoothing because some info about sound quality is lost when plots are smoothed.
Aside from a small correction of the microphone itself also some correction in the lowest frequencies is applied to the plots to compensate for the perceived loss of bass when using headphones. This is described HERE in more detail.
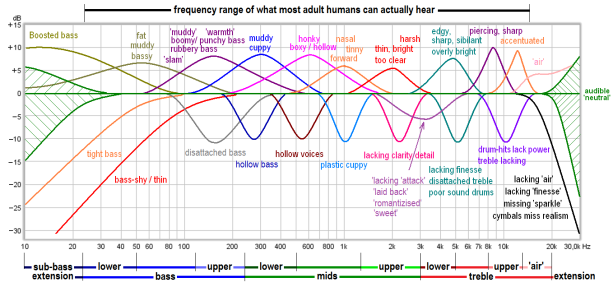
A ‘horizontal‘ frequency response curve on the shown frequency response plots on this website thus indicates a perceived ‘flat’ tonal signature.
ALL measurements are made with a good SEAL on a flatbed measurement rig.
The shape of your head, bone structure, pad size, pad ‘softness, (compliance), hair or no hair and or wearing glasses may (drastically) change the frequency response of some headphones, so… your personal experience may differ substantially from these plots.
Frequency response (tonal balance) is the most sound-determining aspect of headphones. A horizontal line shows audible neutral response in the plots on this website. Deviations in different severities at different frequency bands have an effect on the sound character.
The bigger the deviation the stronger the effect.
Below an aid to help determining the sound character of headphones with relation to the frequency response.
Sennheiser HD 559

The Sennheiser HD 559 is an open over-ear headphone. When this headphone came out (nov. 2016) it sold for around € 150 but at the end 2020 the street price dropped to around € 80.- This is the cheaper little brother of the HD599.
It comes with a 3m detachable cable and has a 6.3mm plug.
The cable is slightly microphonic so in quiet passages and silences the cable rubbing against clothes is audible in the left cup.
The headband is soft and comfortable and so are the velours pads. The pads do feel a bit ‘prickly’ and firm but reckon that over time they will soften up and feel more comfortable.
There is enough room for most ears. Height adjustment and tilt of the cups is large enough to suit most head sizes well.
The clamping force is ‘medium’ so it won’t move around on the head easily.
Its very low weight contributes to this as well and ensures one can do longer listening sessions with it.
The velour pads are exchangeable and all black. The same pads are used on the (much better sounding) HD560S.
Those that have their ear touch the driver and are annoyed by it in the HD6xx series may be pleased to hear there is more depth in the HD559. The HD6xx series has about 21mm depth in the front and rear side where the HD559 has 21mm in the front and 28mm in the back (where it counts). If one has very big ears the triangle (for the cup swivel parts) might be an issue. Still, the depth is 25mm and thus more than 21.
One does NOT have to worry about seal being essential for excellent bass extension.
The cups can swivel far enough sideways but the vertical tilt is a bit limited. The headband can be extended over a good range so it is possible to get a good fit with larger heads as well.
This is a lightweight headphone that feels a bit cheap.
The 3m long cable is connected via a locking 2.5mm TRRS connector and has a 6.3mm TRS plug on the other end. This indicates that this headphone is primarily intended for home/desktop usage.
Internally the cable is 4-wire construction litze wire and the return signals are combined in the 6.3mm TRS plug. Those that know how to solder litze wire can shorten the cable or turn it into a balanced cable.
With a sensitivity of around 115dB/V (specified as 108dB/V @ 1kHz by the manufacturer) the HD559 can be used directly from a phone and reach high enough levels for normal music listening. To reach impressive levels it needs a bit more voltage than a phone, tablet or USB dongle.
Note: I bought this headphone second hand.
specifications:
Type: Over ear, open
Usage: Home, studio, transportable.
Driver type: dynamic
Pads: replaceable, velours
Collapsible: No
Headphone cup connector: Sennheiser locking 2.5mm TRRS jack
Cable entry: single sided, left cup.
Cable: 3m terminated in 6.3mm TRS jack.
Driver size: 38mm (36mm membrane), angled 9°
Inner Pad dimensions: depth font = 21mm, rear = 28mm, Width = 40mm, height = 70mm, oval shaped
Max. power rating: 0.1W
Max. voltage: 2.5Vrms (7Vpp)
Max. current: 45mA
Max. S.P.L.: 121 dB
Impedance: 54 Ω (measured)
Efficiency: 102dB @ 1mW
Sensitivity: 115dB @ 1V (the data sheet mentions 108dB/V@1kHz)
Weight: 240 g. (excl. cable)
Clamping force: medium
Subjective sound description:
The sound quality is far from ‘neutral’. It has a boomy and hollow sound with coarse/grainy upper mids and is lacking in ‘air’.
Bass is overblown, muddy, hollow and lacking in sound quality. Mids are overly warm/hollow and sound a bit distant and coarse.
Treble is a bit subdued but present with a sharpish ‘edge’ to it and lacks in nuances and ‘air’.
Measurements:
Below the frequency response of the HD 559 (Left, Right)

The channel matching is good, but that’s about all that is good about it alas. At least from a ‘hi-fi’ standpoint.
Bass is well extended and rolls off very gently below 25Hz. From 25Hz to 1kHz the response is anything but linear and peaks around 200Hz at +10dB. At the top of this page there is a plot showing sound descriptions and when you look at the 20 Hz to 1kHz range you will notice the following descriptors: fat, muddy, cuppy, honky, hollow and indeed all apply.
A second wide elevation between 1kHz and 10kHz is responsible for the coarseness and sharpish upper mids/treble.
comparisons
Below a comparative measurement of the HD559 and its more expensive bigger brother HD599 Bass extension is the same. Between 20Hz and 1kHz the HD559 has a lot more emphasis than the better sounding HD599. Treble response from 4kHz is a bit higher and less refined than the HD559.
Below the HD559 versus the DT880 Black Special Edition
The different tonality from the slightly lower priced HD559 compared to the DT880 BSE is obvious. The overly warm midrange from the HD559 is substantial. Treble peak of the DT880 is higher but because the elevated bass is masking this a bit the DT880 is better sounding in the treble. The HD559 is darker sounding than the already too boomy sounding DT880 black Special Edition.
Below the HD559 versus the well DT990-250
 The DT990 also has an emphasis in the lows (U shaped sound) but is lower in frequency so less boomy and not hollow.
Treble peak of the DT990 is well known. The emphasis around 4kHz of the HD559 makes it sound coarser than the treble peak of the DT990 which is higher up.
output resistance / damping-factor
As this is a dynamic headphone the frequency response can be amplifier output resistance dependent when certain higher output resistance amplifiers are used.
Instead of showing impedance plots, which are hard to ‘read’ when it comes to assessing the tonal balance change in the real world, the HD559 is measured via a few different resistance outputs (0.2Ω, 10Ω, 33Ω and 120Ω). On a higher output resistance amplifier the output level will be lower of course due to voltage division. To compensate for this the amplifier is cranked up to the same level (10dB for 120Ω at 1kHz in this case). This way the plots are overlaid and it is easier to see how the tonal balance changes. Output resistances between the mentioned resistance values will result in tonal changes between those traces.

The tonal balance changes when the HD559 is connected to a higher output resistance amplifier. The resonance frequency is around 100Hz resulting in a warmer and fatter/more bloated sound.
The HD559 should be driven from 0.1 to 10Ω output resistance amplifiers.
Seal can be an issue with closed-back headphones but is usually less of a problem for open headphones. Breaking the seal (improper fit on the head) usually means a loss of (sub)bass. Perfect seal, seal broken with a thick arm pair of glasses and seal substantially broken by slightly lifting the bottom of the pads which can occur when not properly seated.
 The HD559 is fairly insensitive to a seal breach. A substantially broken seal will result in less subbass but the bass ‘hump’ will not be affected much.
Below the distortion measurements of the HD559 (Right channel).
The plot above shows the level differences between the signal (upper trace around 85dB SPL) and the harmonics. Most people prefer to see percentages instead of level differences so below the exact same plot except ‘normalised’ to the actual signal and level differences given in percentages.

Distortion levels in the lowest frequencies are 3rd harmonic dominated pointing to compression alike distortion. Only above 150Hz distortion drops below 1% which is kind of high. Also the 2nd harmonic distortion is still quite high up to 1kHz.
The actual 2nd harmonic distortion above 1kHz may well be lower than 0.2% . A shortcoming of my measurement rig.
Below the CSD (waterfall) plot of the HD559 . (Left and Right are overlaid)

No big red flags here. What can be seen though is a small and short lived resonance at around 4kHz which I don’t think is audible because it is short and in the frequency range where the ear itself also has ringing by itself. The peaking itself thus is more audible than the ringing
A different plot is the spectrum plot. This basically is a CSD (Waterfall) plot but viewed from above where the level differences are colour coded instead of being in the vertical axis. Also the frequency range of the spectrum plot is wider (from 100Hz instead of 500Hz). The time span is also bigger in the spectrum plots and expired time is shown from below to top where in the CSD the time is shown from rear to front.
Below the spectrum plot of the HD559 (Right channel)
The plot shows some lingering in the lows and around 700Hz but no problems in the higher frequencies (aside from 4kHz).
Step response
Below the step response plot which, when the sound is balanced and well extended should show a rise to around 0dB, (indicating fast driver response) and should be slightly sloping downwards indicating bass extension.
The ‘dark’ tonal balance is obvious as the rising edge doesn’t reach 0dB but -6dB. The peaking shows the lower mids are emphasized and bass extension is not that good because of this upper-bass-lower mids boost.
Can this headphone be fixed/improved ?
The hump in the lower mids that makes the HD559 sound bloated/hollow/muddy is masking the treble. This is because of way too much damping and probably done on purpose to justify the price difference from the HD559.
Of course it not difficult to change the damping. This requires removing the pads and removing 3 screws on the edge of the baffle.
Below a picture of the driver with the pads removed. On the right the front of the driver (for those interested). To perform the mods the black cloth (dust cover made of fabric) does not have to be removed. In fact it is better not to remove the dust cover.

On the picture below the modifications are shown. On the left the rear of the driver. In the middle the 4 holes are covered. I used malleable eraser but some tape or other material that seals the holes is also fine as long as the material used cannot get into the holes. Do this mod only if you find the headphone way too warm/bassy/bloated and at your own risk. Using the malleable eraser makes this modification easily and fully reversible.
The picture on the right also shows a (self-adhesive) felt furniture pad with a 3mm hole punched out in the middle. It is stuck on the magnet and makes the air hole in the driver magnet smaller so air can pass through it with more restriction. This too is reversible and one can play with different hole sizes and or closing of only 2 or 3 holes to tune the sound to your taste.

The 4 holes and the rather big magnet hole simply are severely under-damping the driver resulting in the wide resonance around 100-200Hz. Below some tests with the holes to see how much damping is needed to flatten the response.
 Stock HD559 (all holes open), 2 holes shut, 4 holes shut, 4 holes + center hole 4mm and 4 holes + center hole 3mm.
What’s interesting is that bass extension is not really affected. The bass hump is considerable lowered.
Indeed one can make the centre hole even smaller and flatten the response even more but this will give too much air restriction leading to higher distortion. Besides, those that bought this headphone having auditioned them may prefer some lows boost so some of it is still there and works very well for the HD559.
Alas, when doing this modification the coarse mids/treble is no longer masked and the dip around 1kHz that now came to be makes the mids/lower treble over accentuated and is a bit ‘nasty’ and ‘hard’ sounding.
The solution for this is to use a simple electronic filter that only addresses the elevated area. Below the effect of the filter to the modified driver.
The offensive area (1kHz-10kHz) is effectively lowered while leaving the treble extension untouched.
Note that only doing the driver mod but not using the filter will make the HD559 way too clear/forward/hard and a bit coarse sounding.
below the schematic of this filter for the DIYers. Those that cannot make this can order a ready made filter that goes between the amplifier and headphone cable. Info here.
With these mods (+ filter) the sound is much more balanced and much closer and even better than the HD599. The sound is now full, well extended, clear with smooth mids and pleasant soft well extended treble.
Below the frequency response with the mods and filter versus the stock HD559
As the HD559 and HD560S share a similar enclosure (angled drivers and overall construction) the modified HD559 vs the HD560S.
Bass extension is about similar. The HD559 is a bit bassier and mids have a different tonality. Treble isn’t very different. The HD560S is closer to ‘reality’ and has a more natural tonal balance,
Frequency response of the modified and filtered HD559 (Left, Right)
Below the step response. As can be seen the rising edge is now reaching 0dB, there is still some ‘warmth’ and bass extension is much improved because of the more linear response.
Below the CSD.

square-wave and impulse response
Below 40Hz and 440Hz square-waves and 100μs impulse response of the modified HD559, stimulus (and target) and measured response.

Conclusion
The HD559 is a relatively cheap home usage headphone in the HD5xx range. Only the HD518 is cheaper.
Its sound will be disappointing for those looking for ‘realistic’ sound with good clarity. This headphone is overly ‘bassy’ but not as in deep impressive bass but in bloated/fat/hollow/warm bass with subdued highs and a bit coarse mids and no ‘sparkle’.
Those that like to modify headphones and like to tinker will find the headphone responds well to this and can be turned from a poor sounding and overpriced headphone into a quite well sounding headphone with a full bodied and well extended bass and pleasant mids with a good resolution. This takes modifications and the obligated filter though.
The cable is a bit microphonic but replaceable. The locking mechanism seems exclusive for the HD5xx range.


Hi, i’ve tried modding my hd559 with your method and i can confirm that only modifying driver will really make headphone more clear/forward/hard and its kind of strange going from so dark and warm headphones to this clear monster. So i ordered some parts and started building filters and they sound awful. So yeah, my filter is really bad i guess i ordered wrong components.
Can you please share links from mouser, farnel or elpro (or whatever for that matter) for components you recommend? I’ve used following components
Inductor: CH8010332K-542431-T https://www.elpro.org/gb/ctc-coils-ch8010-series/41953-ch8010-3300h.html
Resistance: 1/2W 5% 56R carbon (i had some laying around)
Caps: https://www.elpro.org/gb/wima-mks-2-series/9400-mks-2-10-63-v-047-f.html
Thanks for your work!
Cheers, Lazar
Components are the correct ones.
It should lower the ‘hardness’.
Maybe wiring is incorrect ?
Did you also connect the ground wire. Will sound really weird without it.
You can also check the mods using EQ.
When you lower the 4kHz band and slightly 2kHz and 6kHz as well it should sound fine.
This is what the filter does… its a wideband 4kHz notch filter.
Hi
I dont know about wiring, looks fine to me (nothing is shorted) ( https://ibb.co/HdpPVdt https://ibb.co/zxPbw52 ). All components are there, i have ground, nothing is burned (its ugly as hell but it looks fine) . I will try with protoboard, maybe i will have more luck. I went straight to soldering.
Im feeding them trough topping a50s so its low resistance amp output (im using SE)
Anyhow i tried using pulseeffects EQ and you are right, they sound cool and you NEED to lower around 4KHz.
Thanks again for testing and doing this review and mods!
Cheers
it all looks O.K. The next question would be what are the actual numbers on the inductor and capacitor ?
There is nothing written on inductors except CTC on caps on one side it says “WIMA 0.47 63-” and on other side it says “10” https://ibb.co/KGkrD3Q
Maybe they sent me wrong inductors?
cap values seem correct.
What changes to the sound when using the filter ?
Can you measure the DC resistance of the inductor (no need to unsolder the parts for this)
I’ve just started moving things (a little bit harder) around and it started sounding better (like with eq). My 3.5mm male connector is broken and loose (right channel only) but it f*** up both channels for output somehow. Moving around left connector does nothing. Its 3.5mm male fault.
Resistance of inductor is ~5ohm
Thanks again and sorry for this 🙂
Hi Solderdude,
I wonder if the felt with 3-4mm hole mod as tried on 559 and 58X would also work on 598se. Too me the 598 are overly warm and bassy, especially when used with popular laptops, as possibly the higher source imp most likely causes large boost at driver resonance. Seems that they also have dip around 1.5-3kHz. I EQ it with APO EQ, but would like to have them more functional with other sources.
I would like to thank you for all the measurements, mods, guides, …, and your posts here and there.
I’m enjoying 58X with your mods, 6XX, very decent hps for the money, but I would choose 600 if they were offered at 6XX price. And maybe I will fix my DT880-600 that came with basted driver from warranty job by Beyer repair center in USA: they supposedly change the defective driver which measured way off (I have Clio since I play a bit with DIY loudspeakers). I live in Ottawa, Ontario, so trying to fight with them is a waste of time and money. It’s most likely more reasonable to buy new driver(s) for DT880 and replace it myself, even though I like Sennheisers HD6** series voicing much more, w/o the pesky Beyer peak.
Thanks again
It will lower the midbass for sure. Can’t predict what hole size would be optimal though and if other mods might be needed.
I will try the ones I have made for 58X with 3.5-4mm hole. Will report if it changed for the better.
Thanks for replying
I just bought these headphones today used. I filled those four holes with blue tack. Took me 10 minutes. Such an improvement! So much better. Takes out the lower mid bloat. No other mods needed for watching Netflix on my laptop. “Lower treble harshness” is actually good so I can hear the dialogue well. Thanks for this mod tip!
I just finishing doing this and some change i can hear.. maybe in a few days i can come back and say a little more! i used duck tape for the “holes” in the rear back of the driver. some vacuum cleaner plush filter of 3mm anchor for the driver itself but its not adhesive… so i cant say if its in the same place i installed …